
IKEA Pax wardrobes have quickly become the top money-saving hack for DIY & self-build homemakers. With endless possibilities for customisation, they are an excellent way to refresh your space, serving as both a practical storage solution and a stylish statement piece, tailored to your home's flow.
Managing a small budget for an entirely new build or a home refresh often means the dressing room doesn't always receive ample funding. But through this trending IKEA wardrobe hack, you can achieve the luxurious and statement wardrobe look you desire with some simple DIY hacks.
Want to know how you can build your dream wardrobes on a budget? Keep reading to find out how our founder, Caroline, achieved this gorgeous built-in dressing room area.
THE PROCESS
Let's talk about space...
For this project, we transformed the primary bedroom, which already had a designated space fitted with small built-in oak wardrobes arranged in an L-shape against the bedroom's back wall. There was also a small gap at the end of the wardrobe, which presented an opportunity to install bespoke shelving for storing accessories, bags, and shoes. So that's what we did!
While recognising the underutilisation of the space and insufficient storage, we had to get creative with the layout and our options for maximising the space.
Increasing storage:
With open space between two of the bedroom windows, we decided to fit a double 60 cm deep IKEA wardrobe opposite the original wardrobes. This new addition was strategically positioned to face the existing wardrobe, with the back cleverly disguised with a large piece of MDF wood to give the illusion of a false wall. This simple trick completely transformed the area, turning it into a chic bijou dressing room that seamlessly blended with the rest of the room.
Not only did the faux wall provide additional wardrobe space, but it also effectively used the once-wasted space to create a private cove to get ready in. To maintain continuity, matching coving was added to the top of each wardrobe unit to eliminate the space between it and the ceiling.
Expanding storage options further, an additional IKEA triple wardrobe was installed on a platform to create the illusion of a standalone fitted wardrobe, extending to the room's full height. We positioned this adjacent to the back-to-front wardrobe but with a gap allowing passage through, contributing to the walk-in dressing room ambiance.
To complement the wardrobes, a bank of oak drawers was painted in the same colour. A valuable tip offered is to opt for doors of the same style as your wardrobes to achieve a cohesive look, then you can add your personalised touch, whether that be your paint colour or cabinetry hardware. Additionally, to save more of your budget sourcing preloved doors for repainting or upholstering can significantly alter the overall aesthetic, reflecting one's unique style.
The design details:
This project aimed to brighten the room and give it that luxurious touch. So, once all of the IKEA units were fitted and the desired trimming and coving were added, we then had all of the wardrobes and drawers painted in the colours 'Strong White' and 'All White' by Farrow and Ball in harmony with the walls, amplifying the sense of spaciousness.
Additional design features, including adding mirrors on two of the doors, further
elevated the room's luminosity, enhancing its overall openness and brightness. Mirrors are a must-have within every dressing room and the perfect solution to optimising space by adding them to the front of your wardrobes.
Although the doors originally varied slightly in colour and style, we achieved a cohesive look by painting and wallpapering the wardrobe coving to match the wallpaper in the bedroom. To do this, we measured our wallpaper to fit the surface area we wanted to cover and applied paste using a brush and roller, allowing it to soak. Carefully aligning the wallpaper to the surface, especially around furniture to avoid damage, we smoothed out any bubbles or paste lumps.
Tip: For tricky spots, use a plastic squeegee or spatula, paying extra attention to edges and corners for proper adhesion.
This quick and easy job made a significant difference to the overall feel and look of the space, transforming a plain, boring wardrobe into a contemporary and luxurious piece of furniture.
Choosing the perfect cabinetry hardware:
When considering the final touches, we carefully selected cabinetry hardware to infuse the space with a final touch of luxury and timeless style. Our choice fell upon The Brass Barrington Pull Handles from Hendel and Hendel, seamlessly pulling the entire design together.
However, the choice of handles is entirely dependent on your preference and style. Similar to positioning, deciding whether to opt for a knob or a pull is entirely up to you. For larger, heavier doors, pulls are likely to be a better choice, allowing your whole hand to grab instead of just your fingertips.
Pay attention to the style and edges of your units; for example, if you have predominantly curved details, consider selecting handles that mimic these lines. Think about whether you want your wardrobe handles to blend in with the overall colour scheme or if you prefer to make a bold statement with contrasting colours. Linking the colour and finish to other elements of the room like lighting and décor pieces is an excellent way to maintain fluidity in the space.
Discover our bespoke services
Are you looking to improve your space with a custom built-in walk-in wardrobe? Allow us to bring your vision to life with our bespoke sourcing and styling services. Connect with our founder Caroline, to create a custom solution that matches your style while maximising functionality for your home.
ENQUIRE TODAY
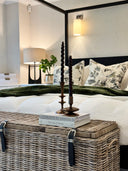
THE FINISHED LOOK
How to Transform your IKEA PAX Wardrobes Into a Custom Built-In Closet
IKEA Pax wardrobes have quickly become the top money-saving hack for DIY & self-build homemakers. With endless possibilities for customisation, they are an excellent way to refresh your space, serving as both a practical storage solution and a stylish statement piece, tailored to your home's flow.
Managing a small budget for an entirely new build or a home refresh often means the dressing room doesn't always receive ample funding. But through this trending IKEA wardrobe hack, you can achieve the luxurious and statement wardrobe look you desire with some simple DIY hacks.
THE PROCESS
Let's talk about space...
For this project, we transformed the primary bedroom, which already had a designated space fitted with small built-in oak wardrobes arranged in an L-shape against the bedroom's back wall. There was also a small gap at the end of the wardrobe, which presented an opportunity to install bespoke shelving for storing accessories, bags, and shoes. So that's what we did!
While recognising the underutilisation of the space and insufficient storage, we had to get creative with the layout and our options for maximising the space.
Increasing storage:
With open space between two of the bedroom windows, we decided to fit a double 60 cm deep IKEA wardrobe opposite the original wardrobes. This new addition was strategically positioned to face the existing wardrobe, with the back cleverly disguised with a large piece of MDF wood to give the illusion of a false wall. This simple trick completely transformed the area, turning it into a chic bijou dressing room that seamlessly blended with the rest of the room.
Not only did the faux wall provide additional wardrobe space, but it also effectively used the once-wasted space to create a private cove to get ready in. To maintain continuity, matching coving was added to the top of each wardrobe unit to eliminate the space between it and the ceiling.
Expanding storage options further, an additional IKEA triple wardrobe was installed on a platform to create the illusion of a standalone fitted wardrobe, extending to the room's full height. We positioned this adjacent to the back-to-front wardrobe but with a gap allowing passage through, contributing to the walk-in dressing room ambiance.
To complement the wardrobes, a bank of oak drawers was painted in the same colour. A valuable tip offered is to opt for doors of the same style as your wardrobes to achieve a cohesive look, then you can add your personalised touch, whether that be your paint colour or cabinetry hardware. Additionally, to save more of your budget sourcing preloved doors for repainting or upholstering can significantly alter the overall aesthetic, reflecting one's unique style.
The design details:
This project aimed to brighten the room and give it that luxurious touch. So, once all of the IKEA units were fitted and the desired trimming and coving were added, we then had all of the wardrobes and drawers painted in the colours 'Strong White' and 'All White' by Farrow and Ball in harmony with the walls, amplifying the sense of spaciousness.
Additional design features, including adding mirrors on two of the doors, further
elevated the room's luminosity, enhancing its overall openness and brightness. Mirrors are a must-have within every dressing room and the perfect solution to optimising space by adding them to the front of your wardrobes.
Although the doors originally varied slightly in colour and style, we achieved a cohesive look by painting and wallpapering the wardrobe coving to match the wallpaper in the bedroom. To do this, we measured our wallpaper to fit the surface area we wanted to cover and applied paste using a brush and roller, allowing it to soak. Carefully aligning the wallpaper to the surface, especially around furniture to avoid damage, we smoothed out any bubbles or paste lumps.
Tip: For tricky spots, use a plastic squeegee or spatula, paying extra attention to edges and corners for proper adhesion.
This quick and easy job made a significant difference to the overall feel and look of the space, transforming a plain, boring wardrobe into a contemporary and luxurious piece of furniture.
Choosing the perfect cabinetry hardware:
When considering the final touches, we carefully selected cabinetry hardware to infuse the space with a final touch of luxury and timeless style. Our choice fell upon The Brass Barrington Pull Handles from Hendel and Hendel, seamlessly pulling the entire design together.
However, the choice of handles is entirely dependent on your preference and style. Similar to positioning, deciding whether to opt for a knob or a pull is entirely up to you. For larger, heavier doors, pulls are likely to be a better choice, allowing your whole hand to grab instead of just your fingertips.
Pay attention to the style and edges of your units; for example, if you have predominantly curved details, consider selecting handles that mimic these lines. Think about whether you want your wardrobe handles to blend in with the overall colour scheme or if you prefer to make a bold statement with contrasting colours. Linking the colour and finish to other elements of the room like lighting and décor pieces is an excellent way to maintain fluidity in the space.
Discover our bespoke services
Are you looking to improve your space with a custom built-in walk-in wardrobe? Allow us to bring your vision to life with our bespoke sourcing and styling services. Connect with our founder Caroline, to create a custom solution that matches your style while maximising functionality for your home.
ENQUIRE TODAY
THE FINISHED LOOK